Showing posts with label goals. Show all posts

Thursday, July 1, 2010

April Goal: Making Pasta!

Pasta. What can I say? The homemade stuff is worth the hassle. Even without fancy equipment to roll out the dough, I had a blast trying out pasta for the first time. The smooth pliability of the dough fascinated me, especially in contrast with the sticky, difficult bread or pastry doughs I am used to working with.

I chose to make an artichoke shallot parmesan filling, inspired by this Smitten Kitchen post. I wanted to do a simple tomato & cream sauce, otherwise I might have gone with something like a goat cheese/sweet potato filling (which I think would have been gone best with a browned butter sauce).

First I mixed the dough with a few quick pulses in the food processor, and let it sit under a small bowl. Then, after cooking up my filling, I pulsed it in the food processor with some parmesan cheese and worked on making and rolling out the dough. Although it certainly took more time and more strength to roll out that a pie crust, this beautiful stuff didn't tear, and it didn't stick. I'd even go so far to say that it was a joy to roll out.

I should say that it was a joy to roll out the first time. After I had cut out my first batch of ravioli, I rolled up the extra surrounding dough in with my second batch. This was not that great of an idea. The dough scraps had already sucked up the flour from the counter, and they were much more dry than the un-rolled-out dough. And more dry means more difficult to roll out. Next time I'll go easier on the flour or not re-use the dough scraps. So my second batch turned out significantly thicker. Boo.

But my little ravioli punch (the wood and metal device in the top of the above picture) worked like a dream. The inside of it is spring loaded, so it expands to allow a big heap of filling. And when the dough was treated with a dab of water, it sealed perfectly.

The experience of making my own pasta has gotten my creative juices flowing. My specialty is dessert, so how about this? Lightly green pistachio ravioli, filled with ricotta, sauced with a chocolate & brown butter sauce: Bam! Cannoli ravioli. It even has pretty much the most awesome dessert name ever.

But as for the here and now. Here is the recipe:

Artichoke Ravioli with Tomato Cream Sauce
adapted from this recipe at Smitten Kitchen
serves 4 as a side dish, 3 as a main dish

Ingredients
for the pasta
1 1/2 cups all-purpose flour
2 large eggs
1/2 tsp salt
2 Tbsp water

for the filling
2 Tbsp unsalted butter
2 small shallots, chopped (about 1/2 cup)
1 (10-oz) box frozen artichoke hearts, thawed and patted dry
1/2 cup grated parmesan cheese
1/3 cup chopped flat-leaf parsley
1 large egg yolk
1/2 tsp fresh lemon juice
1/4 tsp salt
1/4 tsp black pepper
1 tsp ground nutmeg
1 large egg white, lightly beaten with 2 tsp water (for ravioli sealant)

for sauce (amounts approximate and for half a batch of ravioli)
1 Tbsp olive oil
2 cloves garlic, minced
1/2 can diced tomatoes, with juice
1/2 cup white wine (or more)
1/2 cup cream (half and half or heavy cream)
small handful basil, sliced into thin strips

Directions
for the ravioli
1. Blend ingredients for pasta in a food processor until the mixture begins to ball up, and add more water, a drop at a time, if the dough is too dry. Process for 15 seconds more. Transfer to a small plate and cover with a small inverted bowl. Let stand for 1 hour to let the gluten relax.
2. Heat butter in a 12-inch skillet over medium heat, until melted. Add shallots and saute until soft, about 7 minutes. Add artichoke hearts and continue to saute for another 8 minutes. Remove from heat and let cool for 5 or 10 minutes.
3. Transfer artichoke mixture to cleaned food processor, and add cheese, parsley, yolk, lemon juice, salt, pepper, and nutmeg. Pulse until the mixture is coarsely chopped.
4. Separate pasta dough into 4 sections. Lightly sprinkle your work surface with flour (you don't need much). Take one section and begin to roll it out into an approximately rectangular shape. You want the pasta to be thinner than a dime. About.com has some good tips for getting your pasta thin here. See the original recipe at Smitten Kitchen for instructions for rolling out your dough with a pasta roller attachment.
5. Drop filling into evenly spaced mounds on one half of your pasta sheet. Amounts can range from 1 tsp to 3 tsp depending on the size of ravioli you want to make. Brush the egg white and water mixture around each mound, and fold the empty half of the sheet over the top of the mounded half. Press the pasta down around each mound. Cut around each mound or use a ravioli press to form each individual ravioli. Put them on a sheet of wax paper while you roll out and press the other 3 sections.
6. Bring a pot of salted water to a low boil. Boil ravioli for 8 minutes, or until pasta is tender. Freeze remaining any ravioli (which can be boiled for about 10 minutes straight from the freezer).

for the sauce for 1/2 batch of ravioli
1. While your ravioli is boiling, heat olive oil in a skillet over medium heat (perfectly ok to use the one you used to make the filling). Add garlic and cook until it just begins to turn golden. Add tomatoes and turn up the heat to medium high. Cook for 2 or 3 minutes, then add white wine. Cook for 5 minutes. Turn heat to low, and add cream. Salt to taste.
2. Lift ravioli from boiling water, and put into serving bowls. Spoon sauce over the top, and garnish with basil chiffonade.

Posted by Picasa

Thursday, May 20, 2010

March Goal: Yeast Bread

March has come and gone, and I've only sort of accomplished my March goal. Technically, these fantastic cinnamon rolls are made from a yeast dough, but a) they don't compare in difficulty to a full-blown bread, and b) I've made cinnamon rolls with yeast before. Actually, I used to make basic cinnamon rolls every Christmas for breakfast.

So why have I cut corners? Well, March was crazy: the busy season of my last semester of classes and the weeks before I presented research at a conference in Seattle. Also, for the potluck on the last Thursday of March, everyone was supposed to bring something from their past, or their family, and, as I said, I used to make cinnamon rolls for Christmas. So I killed two birds with one stone.


I was able to take this opportunity to fix the things that never worked out so well about my Christmas morning cinnamon rolls. First of all, I don't remember doing much actual kneading of the dough. Secondly, in my impatience, I'd make the rolls, then set them in the oven set at the lowest setting to let them rise. Instead, they'd often just dry out and stay the same size. (My dear family never complained, and even complemented the rolls on not being too sickeningly sweet and gooey.) This time, I kneaded the dough thoroughly for the recommended 10 minutes. Also, I let it rise both before and after forming the rolls, both times in an oven that had been turned on, and then turned off.

Oh, and these weren't just plain Jane cinnamon rolls; they were cardamom cinnamon rolls. Perhaps I haven't been blogging long enough for you to know this, but I am pretty obsessed with cardamom. And I had recently obtained whole cardamom pods from my friend Aditya (who uses them in savory Indian cooking). So that was quite a treat. And one last thing: there's no cream cheese frosting on top of the cinnamon rolls; it's actually spread on the inside before the cinnamon-sugar filling, so it permeates the whole roll. Perfection!

After all was baked and eaten, it's clear that the cinnamon rolls were a good move. And I can always fit some more intense bread-baking into the less-stressful summer months.


Cardamom Cinnamon Rolls
from The Paupered Chef

Ingredients
for the dough
3/4 cup milk
1/3 cup sugar
1/2 cup unsalted butter at room temperature
3/4 tsp salt
1 package yeast
1 egg, beaten
3 cups all purpose flour
zest of 1 lemon
two teaspoons whole black cardamom pieces (from inside cardamom pods), ground in a mortar and pestle or spice blender

for the frosting filling
4 oz cream cheese at room temperature
1 cup powdered sugar
6 Tbsp unsalted butter

for the cinnamon filling
1 cup brown sugar
1 Tbsp ground cinnamon

for topping the rolls
1 egg, beaten
1/2 cup pearl sugar (optional)

Directions
1. Scald the milk in a saucepan (until bubbles form around the edge, but before the whole thing boils).
2. Put the butter, sugar, salt, and cardamom in a large bowl. Pour in the hot milk and stir to combine.
3. Proof the yeast: put it in a small bowl with 1/2 tsp sugar and 2 Tbsp warm (but not hot) water. Meanwhile, add about half of the flour and the lemon zest to the milk mixture, and stir well. When the yeast begins to foam, add it to the milk mixture, along with the beaten egg. Mix well.
4. Continue adding the rest of the flour, and stirring until flour is mostly mixed in. Switch to kneading with your hands, adding flour until the dough no longer sticks to your fingers (it should feel sticky, but not actually stick, thanks to the butter). Knead for approximately 10 minutes.
5. Cover the dough in the bowl with a kitchen towel and allow to rise in a warm place for at least an hour. (One good option is to turn on the oven to the lowest setting while kneading, and turn it off before setting the bowl in the oven.)
6. While dough is rising, combine frosting ingredients in a mixing bowl and beat with a hand mixer until smooth. In a separate medium bowl, mix together the brown sugar and cinnamon.
7. When the dough is about double in size, turn it out onto a lightly floured surface, and divide it into 2 pieces. Roll one piece into a large rectangle, about 1 foot by 1 1/2 feet. The dough should be about 1/4 inch thick.
8. Spread half of the frosting mixture into a thin layer on the dough (avoiding the outer inch of the dough). Sprinkle with half of the brown sugar mixture.
9. Roll the rectangle from one of the longer sides into a long cylinder. Transfer the roll to a cutting board, and use a very sharp knife to cut the cylinder into 1 inch wide pieces. Set these into a rectangular baking dish, with no room between them.
10. Roll out, frost, sugar, roll up, and cut the second piece of dough, placing the rolls in the baking dish with the others.
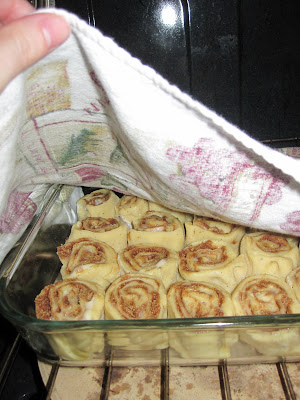
11. Cover with plastic wrap and a kitchen towel and allow to rise in a warm place for 45 minutes.
12. Preheat the oven to 350 degrees F. Uncover the rolls and lightly brush them with the beaten egg. (Optional: sprinkle with the pearl sugar).
13. Bake the rolls until they just begin to brown, 15-20 minutes.

Did I mention that that was the night that the 5th seeded Bulldog basketball team from my alma mater, Butler University, beat the 1 seed Syracuse? Here's a screen shot when they were tied...

Posted by Picasa

Saturday, March 20, 2010

February Goal: Mussels for Valentine's

After having a delicious bowl of mussels with chorizo at The Blue Marlin during winter restaurant week, I decided I would recreate this dish for my February cooking goal.

Gabriel and I decided that instead of going out on Valentine's Day and facing overpriced meals and crowded dining rooms, I'd make dinner on the 14th, and we'd go out to our favorite restaurant, Sardine, later in the week. So mussels and chorizo went on the menu for v-day.

I don't often cook seafood, and when I do, it's usually fish from the freezer section. So even buying the mussels took me out of my comfort zone. I found a small seafood store in Madison, and ventured there on the 13th. I bought 2 lbs of fresh mussels, and stored them in the fridge in a bowl covered with a damp cloth. The next afternoon, I found one of the mussels had clamped on to the cloth. They were alive for sure!

To prepare the mussels, they first took a 30 minute soak in bowl of flour and water (so, in principle, they will disgorge sand and take in flour, making them plumper). Next I went over the shells with a wire scrubber and pulled out the stringy "beard" that helps them attach to rocks. I also discarded mussels that were open and didn't close after I tapped them. Finally, the mussels went into a hot pot of white wine, tomatoes, chorizo, shallots, garlic, and thyme. I was roughly following an Ina Garten recipe to make sure I had about the right proportions and for the method, but otherwise I was winging it. (My recipe appears at the end of this post.)

After a few minutes steaming in the wine, the mussels started to swing open. Gabriel and I peered in through the clear lid at the yawning shells. The smell of shallots cooked in chorizo fat was making our mouths water, and it was difficult to wait the 8 minutes it took for them to steam.

The rest of the menu was decided at the last minute. I was going to make short ribs, but I didn't have a great recipe for them. At the farmer's market, the vendor showed me a few different cuts of meat, and I finally decided on a large top sirloin that ended up providing 4 smaller steaks.

For dessert, Gabriel wanted something chocolate (maybe), and not fruit (probably). He's more of a milk chocolate guy, while I often find milk chocolate too one-note and sweet for my tastes. But I found a very interesting and not-at-all one-note recipe in Bon Appetit's February special on milk chocolate.

mussels steamed in white wine with chorizo
Dr. Beckermann Liebfraumilch (our favorite Trader Joe's wine)

top sirloin from Fountain Prairie Farms
butternut squash risotto

Les Jamelle Pinot Noir (a gift from Carlos and Lana)

Mussels Steamed in White Wine with Chorizo
Serves 2-3 as a large appetizer

Ingredients
2 lbs fresh mussels
1/4 cup flour
1/2 lb bulk chorizo
1 Tbsp + 1 tsp olive oil
2 or 3 shallots, chopped
2 or 3 cloves garlic, finely chopped
1/2 14oz can diced tomatoes
1 1/2 cups white wine
1 cup chicken broth
2 sprigs fresh thyme

Directions
1. To prepare the mussels, put them in a bowl with 2 quarts water and flour, and let sit for 30 minutes. Pull off the "beard," and scrub shells with a brush or metal scrubber if they are dirty. Discard shells that are open which do not close tightly soon after being tapped.
2. Heat 1 Tbsp olive oil at medium-high in a large pot with a tight-fitting lid. Break chorizo into small pieces and brown it in the olive oil.
3. Remove chorizo with a slotted spoon, leaving the fat. Add additional olive oil if needed. Saute shallots in the oil until they are tender. Add garlic and saute for 2 minutes more, stirring, and making sure the garlic doesn't burn. Add tomatoes.
4. Pour in white wine, and let it boil down for a few minutes, scraping the bottom of the pan. Add the chick broth, reserved chorizo, and thyme. Bring to a boil.
5. Add the mussels. Cover the pot and steam for 8 minutes. Discard any mussels that have not opened after 8 minutes.
6. Serve mussels in bowls, and ladle cooking broth and chorizo over them. Enjoy!


Posted by Picasa

Saturday, February 27, 2010

Andi & Julia: January Goal

My goal for the month of January was to cook a meal taken entirely from Julia Child's Mastering the Art of French Cooking. Since most of the recipes are supposed to serve six, and I didn't want to try halving the recipes, I invited two friends whose potlucks, dinner parties, and food experimentation always inspire me: Carlos and Lana. Along with Gabriel, I figured the four of us could handle food for six, leaving me with a few leftovers. When choosing a menu I had a few things I kept in mind. My first constraint was the lack of a good heavy dutch oven that can go between the stove-top and the oven. I also wanted to cook either a chicken or a beef dish for the main course. As for the dessert, I wanted to choose a cake, simply because it would be a little more in my comfort zone. Here's the final menu:

Boston Bibb Letuce Salad with Sauce Vinaigrette
with goat cheese, cherry tomatoes, and almonds

Sauté de Boeuf à la Bourguignonne
with mushrooms, bacon, and onions

Pomme de Terre Saut
ées en Dés

French Baguette

Reine De Saba
with chocolate-butter icing and almonds

I actually started my preparation (on the last Saturday of January) by making the cake, but let me first describe the main part of the meal. I sautéed the mushrooms for the beef burgundy first, and then made the glazed baby onions. That was what I used the bouquet garni seen at the beginning of the post for. Then I started cutting the potatoes into a small dice. The sautéed potatoes were the suggested side dish for the beef, but rather than the "elongated olive shape" suggested in the main recipe, or potato balls, formed using a "potato-ball cutter," I chose the much simpler dice. They went in a non-stick pan with butter and olive oil, and at this point, Gabriel took over the potatoes. He was much more talented than I at the shaking and flipping required to keep the potatoes from sticking or cooking too much on one side. The beef dish was actually the faster sauté version of the famous boeuf bourguignonne that was such a big deal for the food-blogger Julie in Julie & Julia. So I started by browning the sirloin steak, leaving it a little rare in the middle. Then I started on the really fantastic sauce: red wine, garlic, beef stock, and tomato paste, all thickened with a beurre manié (a paste of butter and flour, whisked in at the end). At the very end, Gabriel helped me assemble the salad and shake up the vinaigrette in a mason jar.

I felt a little overwhelmed near the end, and almost forgot a few important parts of the sauce for the beef, but sitting down at the table with my friends and a glass of wine, I felt it was all worth it. The salad was a good combination of the tangy dressing and the sweet tomatoes, the creamy cheese and the crunchy almonds. The potatoes were simple, dressed only in butter and herbs, but they were so smooth, with the texture almost like that of a risotto. (I've made them since, in an stainless steel pan, with much less success - non-stick is the way to go). The beef was tender and flavorful, but the big hit was the sauce, which I will admit we were sopping up with bread and eventually eating straight from the pan.

Now to the important part: dessert. The chocolate was set to melt in a bowl over simmering water, and the butter and sugar were creamed together. And then, partly because I wanted to try it by hand, and partly because I didn't want to wash the beaters I had used for the butter and sugar, and beat my egg-whites by hand. It was tiring, and it took a little bit longer, but it resulted in a finer and more consistent foam. And holding up my whisk and seeing stiff peaks felt a lot more rewarding than when I use electric beaters. I mixed the chocolate with the butter and almond meal, and then carefully folded in the whites and flour. I poured it into a 9 in. pan (although the recipe called for a 8 in pan) and put it into the oven. I should have modified the cooking time because I changed the pan size, but I didn't think about it. So my cake turned out a little less moist than it was supposed to, but it still tasted delicious.

I made the chocolate-butter icing after dinner (wearing pearls, of course) and spread it on the cake. We took a break from playing my favorite game, Pictionary, to dig into the cake. And though I won't reveal who won *both* games of Pictionary, I will say that the cake was a winner. :) So the completion of my first goal for the year was a success. I see more meals inspired by Julia Child in the future...


Posted by Picasa

Sunday, January 10, 2010

The New Year in Food

I am finally back from a rather long winter vacation in Peru, Omaha, and Albuquerque. Before that I was finishing up the semester. But enough with the excuses - I just am not in the habit of writing a blog post regularly. So, in the spirit of the new year, I come to you with a resolution and some cooking goals.

First and foremost, I resolve to blog regularly, both about Thursday potlucks, and about the other exciting food events in my life.

During my flight home a few days ago, I was reading the latest issue of Saveur, which included 100 food topics submitted by readers. The wide variety of topics covered, along with my experiences with new and different food in Peru (more on that in an upcoming post!), inspired me to tackle 12 culinary tasks that I've either put off trying or been intimidated by.

Here is my list, with each task assigned to a month:

January: Cook a meal drawn entirely from Julia Child's Mastering the Art of French Cooking. This was a birthday gift from my wonderful boyfriend, so I'm guessing he will be invited to this meal...

February: Cook a dish including mussels and/or oysters. The whole shell business has always unnerved me, and only recently have I learned to enjoy eating mussels and oysters. Cooking them is the next step!

March: Make a yeast bread. Maybe start with the no-knead type early on in the month and progress to something more intensive.

April: Make my own pasta. This looks fun, but I've never made the time for it. I'd like to try both gnocchi and egg noodles.

May: Bake a "Baked Alaska." Perhaps not as formidable as rolling out pasta, but the thermodynamics of ice cream inside a baked meringue shell is quite intriguing.

June: Eat entirely local for a day. Some people do this on a regular basis, and it shouldn't be too difficult in a food-centric state like Wisconsin. Maybe this will help me start better habits, even if I can't eat entirely local all of the time.

July: Make mulberry ice cream. We have a large mulberry tree in our back yard, which produces more fruit than I know what to do with. I'm also interested in experimenting with methods for making ice cream (or something similar to ice cream) that don't require an ice cream maker, which my small kitchen has no room for.

August: Make ceviche. I hope to include a lot more Peruvian cooking in my repertoire, but I'll admit that this marinated fish dish intimidates me a bit. It may take a resolution and someone's August birthday to get me to try it.

September: Make cherries jubilee. Late summer in Wisconsin is prime time for delicious fresh cherries, and what better way to celebrate Door County cherries than by setting your house on fire? Just kidding - but I would like to try flambeing something.

October: Cook an unusual meat. Our farmers' market routinely has ostrich meat, but I would also consider cooking rabbit or something else I've never tried before.

November: Brine a turkey. As far as I can tell, I'll be staying in Madison for Thanksgiving, which means I will probably host a meal of some kind. And while I've participated in numerous turkey roasts (during which Betty White makes dirty jokes about the turkey... or is that something else?) I've never brined a turkey.

December: Create some awesome homemade food gifts. I wont give away my ideas yet, but I'd like to share some kitchen joy with my dear friends next holiday season. The past two years have included biscotti, but I'd like to push the boundaries to include some non-baked goods.

So goes my plan for the year. I hope to fit this all in with work, school, community choir, and having some sort of social life... but, as I tell my hesitant-to-cook father, "You have to eat anyway, so you might as well have some fun with it!"

Coming up soon - the long awaited ducken-hen post... I know you can hardly wait.