Thursday, July 1, 2010

April Goal: Making Pasta!

Pasta. What can I say? The homemade stuff is worth the hassle. Even without fancy equipment to roll out the dough, I had a blast trying out pasta for the first time. The smooth pliability of the dough fascinated me, especially in contrast with the sticky, difficult bread or pastry doughs I am used to working with.

I chose to make an artichoke shallot parmesan filling, inspired by this Smitten Kitchen post. I wanted to do a simple tomato & cream sauce, otherwise I might have gone with something like a goat cheese/sweet potato filling (which I think would have been gone best with a browned butter sauce).

First I mixed the dough with a few quick pulses in the food processor, and let it sit under a small bowl. Then, after cooking up my filling, I pulsed it in the food processor with some parmesan cheese and worked on making and rolling out the dough. Although it certainly took more time and more strength to roll out that a pie crust, this beautiful stuff didn't tear, and it didn't stick. I'd even go so far to say that it was a joy to roll out.

I should say that it was a joy to roll out the first time. After I had cut out my first batch of ravioli, I rolled up the extra surrounding dough in with my second batch. This was not that great of an idea. The dough scraps had already sucked up the flour from the counter, and they were much more dry than the un-rolled-out dough. And more dry means more difficult to roll out. Next time I'll go easier on the flour or not re-use the dough scraps. So my second batch turned out significantly thicker. Boo.

But my little ravioli punch (the wood and metal device in the top of the above picture) worked like a dream. The inside of it is spring loaded, so it expands to allow a big heap of filling. And when the dough was treated with a dab of water, it sealed perfectly.

The experience of making my own pasta has gotten my creative juices flowing. My specialty is dessert, so how about this? Lightly green pistachio ravioli, filled with ricotta, sauced with a chocolate & brown butter sauce: Bam! Cannoli ravioli. It even has pretty much the most awesome dessert name ever.

But as for the here and now. Here is the recipe:

Artichoke Ravioli with Tomato Cream Sauce
adapted from this recipe at Smitten Kitchen
serves 4 as a side dish, 3 as a main dish

Ingredients
for the pasta
1 1/2 cups all-purpose flour
2 large eggs
1/2 tsp salt
2 Tbsp water

for the filling
2 Tbsp unsalted butter
2 small shallots, chopped (about 1/2 cup)
1 (10-oz) box frozen artichoke hearts, thawed and patted dry
1/2 cup grated parmesan cheese
1/3 cup chopped flat-leaf parsley
1 large egg yolk
1/2 tsp fresh lemon juice
1/4 tsp salt
1/4 tsp black pepper
1 tsp ground nutmeg
1 large egg white, lightly beaten with 2 tsp water (for ravioli sealant)

for sauce (amounts approximate and for half a batch of ravioli)
1 Tbsp olive oil
2 cloves garlic, minced
1/2 can diced tomatoes, with juice
1/2 cup white wine (or more)
1/2 cup cream (half and half or heavy cream)
small handful basil, sliced into thin strips

Directions
for the ravioli
1. Blend ingredients for pasta in a food processor until the mixture begins to ball up, and add more water, a drop at a time, if the dough is too dry. Process for 15 seconds more. Transfer to a small plate and cover with a small inverted bowl. Let stand for 1 hour to let the gluten relax.
2. Heat butter in a 12-inch skillet over medium heat, until melted. Add shallots and saute until soft, about 7 minutes. Add artichoke hearts and continue to saute for another 8 minutes. Remove from heat and let cool for 5 or 10 minutes.
3. Transfer artichoke mixture to cleaned food processor, and add cheese, parsley, yolk, lemon juice, salt, pepper, and nutmeg. Pulse until the mixture is coarsely chopped.
4. Separate pasta dough into 4 sections. Lightly sprinkle your work surface with flour (you don't need much). Take one section and begin to roll it out into an approximately rectangular shape. You want the pasta to be thinner than a dime. About.com has some good tips for getting your pasta thin here. See the original recipe at Smitten Kitchen for instructions for rolling out your dough with a pasta roller attachment.
5. Drop filling into evenly spaced mounds on one half of your pasta sheet. Amounts can range from 1 tsp to 3 tsp depending on the size of ravioli you want to make. Brush the egg white and water mixture around each mound, and fold the empty half of the sheet over the top of the mounded half. Press the pasta down around each mound. Cut around each mound or use a ravioli press to form each individual ravioli. Put them on a sheet of wax paper while you roll out and press the other 3 sections.
6. Bring a pot of salted water to a low boil. Boil ravioli for 8 minutes, or until pasta is tender. Freeze remaining any ravioli (which can be boiled for about 10 minutes straight from the freezer).

for the sauce for 1/2 batch of ravioli
1. While your ravioli is boiling, heat olive oil in a skillet over medium heat (perfectly ok to use the one you used to make the filling). Add garlic and cook until it just begins to turn golden. Add tomatoes and turn up the heat to medium high. Cook for 2 or 3 minutes, then add white wine. Cook for 5 minutes. Turn heat to low, and add cream. Salt to taste.
2. Lift ravioli from boiling water, and put into serving bowls. Spoon sauce over the top, and garnish with basil chiffonade.

Posted by Picasa

Friday, June 18, 2010

CSA Adventures

Community supported agriculture, or CSA, is a great option if you want to decrease your food footprint and eat locally or if you just want to increase the amount and variety of fruits and vegetables in your life. In short, membership in a CSA gets you a big box of fresh-from-the-farm veggies either every week or every other week. Here in Madison, there are quite a few local farms that sell memberships to their CSA program, and most health insurance plans will partially reimburse you for the price. It's a good deal, and it's my first year taking advantage of it.

My first box came with some delicious stuff: green garlic, asparagus, and parsley...

... big long stalks of rhubarb,

... a bunch of beautiful bright red radishes,

... and, here, already wrapped, a head of lettuce and a large bunch of arugula.

Now these ingredients went into a lot of dishes, but the first thing I made (using three of my veggies) was a delicious pancetta asparagus quiche. I luckily had a half-recipe of pie dough in my freezer, so this quiche came together quickly. And the quiche went into our stomachs even more quickly. I had forgotten how a little egg and a little gruyere and a little pie crust can turn any vegetables into something rich, delectable, and sinfully good.

Pancetta and Asparagus Quiche
adapted from this recipe at Simply Recipes

Ingredients
1/2 recipe pie dough (I think mine was from the bottom of this recipe)
1 Tbsp olive oil
1 package pancetta cubes
4 stems of green garlic, sliced (or scallions, or 1 shallot)
10 oz asparagus, cut into 1 inch sections
freshly ground pepper
1/2 cup milk
1/2 cup heavy cream
3 large eggs
6 oz gruyere or a mix of gruyere and swiss cheese, grated (1 1/2 cups)

Directions
1. Preheat oven to 350 degrees. On a lightly floured surface, roll out the pie dough into a 11 inch circle. Fit into a 10 inch pie plate and press it into place. Trim the edges.
2. Place a large sheet of aluminum foil or parchment paper over the crust, and fill with dry beans, dry rice, or aluminum pie weights. Bake for 15 minutes. Remove from the oven, and carefully remove the foil or paper with the weights. Using a fork, poke the pie crust multiple times, and return to the oven to bake for another 10 minutes (or until lightly golden). Set aside to cool while preparing the filling.
3. Heat oil at medium-high in a large skillet. Cook pancetta until crisp. Remove to a small bowl. Add green garlic and cook for 3 minutes, until translucent and tender. Remove to the pancetta bowl. Add asparagus and cook for 5 minutes. Pour in a little water (to just cover the bottom of the pan) and cover. Cook for 3 more minutes, remove the lid and finish cooking until the water is gone.
4. Increase the oven temperature to 375 degrees. Place the pie pan on a baking sheet to catch any spills or overflow. Sprinkle half of the cheese onto the crust and top with the asparagus, pancetta, and garlic. Sprinkle the rest of the cheese on a top.
5. In a medium bowl, whisk together the milk, cream, eggs, and pepper. Pour over the filling. Transfer the baking sheet and quiche to the oven and bake until it is set in the center, 30 to 35 minutes. Allow to cool for 10 minutes before slicing.

Posted by Picasa

Wednesday, June 16, 2010

Potluck 4/22: Mad Scientists

While I was in Seattle listening to talks about plasma, it was decided that I should host potluck the day after I returned. Since my brain was pretty geared towards science, I figured it was about time to have a mad scientist potluck, filled with (possibly) science-themed food. Or at least food that we can experimentally prove tastes delicious.

First things first: any good science party needs a genuine science experiment. And since I like my rented microwave too much to make grape plasma in it, I went with the always popular non-Newtonian fluid: corn starch and water. What I mean by non-Newtonian is this - this mixture will feel like a liquid (like white glue) if you touch it slowly, not putting a lot of force on it, but it will feel more solid (like thick, wet sand) if you poke it quickly. Lana and Laura demonstrate...
Later on in the evening I demonstrated that it could be rolled (with a fast, constant motion) into a ball, which I then threw against the outside of the house. It stayed ball-shaped and hard for long enough to slam into the wall and fall to the ground, but then it melted like the Wicked Witch of the West, slipping through the cracks on the deck.

Another science project that I provided was savory molecules. Cherry tomatoes, basil, mozzarella balls, and chunks of carrot took the place of hydrogen, oxygen, and other atoms in some complex molecules, made by Aditya. I think here we have caffeine and one other one. What can I say, chemistry has never been my thing.

I did take solid state physics, though, so I am a pro (ha! not really...) at crystalline structures such as the ever-popular "body centered cubic" shown below.

Lana took a more zoological approach, with her dog (neck-less giraffe?) figure, seen below with some H2O and balsamic vinaigrette.


Every scientist needs a little liquid inspiration, which Mike so boldly provided.

Geoffrey and Laura provided nourishment in the form of delicious peanut and potato stew. Just looking at this picture makes me salivate like Pavlov's dog.


My final contribution was, naturally, a dessert. The end result was not particularly science-y, but I do find the transformation of the ingredients to be a testament to kitchen science. Because, let's face it, a plain mixture of lemon juice, eggs, and whipping cream doesn't sound all that appetizing.


But add a little sugar, heat, and lots of whisking, and you end up with lemon mousse: rich and fluffy, with a flavor like lemon drops. Now that is a good use of science. And here's the recipe!

Lemon Mousse
from The Amateur Gourmet

Ingredients
2 egg yolks
1 whole egg
2 lemons
1/3 cup sugar
3/4 cup heavy cream

Directions
1. Start a pot filled 1/4 of the way with water boiling on the stove. In a bowl, roughly whisk together the egg yolks, whole egg, sugar, and the grated peel and juice of the lemons. Prepare a larger bowl with ice cubes and cold water.
2. Place the bowl with the egg mixture over the boiling water (taking care that the bottom doesn't touch the water), and whisk until the mixture thickens to the consistency of cake batter.
3. Move the bowl with the egg mixture to the ice-water bath, and whisk occasionally until it cools to room temperature. Meanwhile, use a hand-held mixer to whip the cream (along with a pinch of sugar) until you have stiff-ish peaks.
4. Whisk 1/3 of the whipped cream into the lemon curd. Gently fold in the remaining whipped cream with a spatula, until no streaks of pure lemon curd remain. Chill until you're ready to devour it.

Posted by Picasa

Wednesday, May 26, 2010

Food in the Emerald City

A scientific conference took me to Seattle in mid-April. It was my first time in Seattle (and my first time in Washington), and I was lucky enough to have both a day off mid-conference and a dear friend living there to guide me to some awesome places in Seattle. Oh... and it turns out she works at a bakery part-time, and we have separately both grown to be a little obsessed with good food.

As I suppose any good food tour of Seattle begins, we started at Pike Place Market. I was first impressed by the wide variety of crafts, and then the huge stalls of tulips.

Then we started passing stands with huge selections of seafood, including monkfish, a huge octopus, razor clams, river salmon, and, of course, fresh fish being tossed about by burly fish-mongers. At this point, I think I was convinced that Seattle is just as wonderful as Madison (if not more so).


Next we stopped at the nearby Sur La Table store, where, after much ogling, I picked out a small square ravioli press (which you'll see in a future post). Then we hopped on a bus and headed over to Fremont (a very hip neighborhood in Seattle). We picked up chocolate hazelnut cookies from Flying Apron for my officemate/hotelroommate, who doesn't eat gluten and was trying out a totally grain-free diet. For lunch, we had sandwiches at Homegrown, a cute sustainable sandwich/soup/salad place.

For dessert #1, we checked out the shop at Theo Chocolate Inc. They had samples of all kinds of crazy chocolate bars , along with standard high quality regular milk and dark chocolate. My favorite flavors were spicy chile and fennel & fig. I had high expectations for the coconut curry bar, but it ended up just tasting kind of odd.

Dessert #2 was a honey rose lollipop from a tiny hole-in-the-wall shop, and we enjoyed them as we waited for our bus back to downtown.

But my Seattle fun didn't end when I had to hug my friend goodbye on Sunday. On Tuesday, a group of intrepid plasma theorists walked downhill from hotel to a restaurant called Nijo Sushi. My officemate enjoyed a big plate of sashimi with no soy sauce and no rice, and another in our group got some sushi rolls that were on fire! (See the "Flamin' Fire" below.)

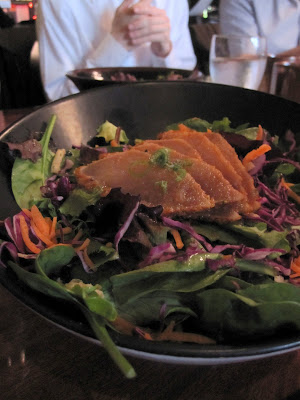
I ordered a bowl of sake steamed mussels that were tasty, though I was surprised at the number of them that were unopened. I assumed that at a restaurant like this, they wouldn't serve the unopened ones. I also had a seared tuna salad, which was absolutely heavenly. The crust on the edge of the tuna was flavorful and matched perfectly with the sesame dressing.


What can I say? I can't wait to go back to Seattle, maybe find a hotel suite with a kitchen, and enjoy some more great northwestern cuisine!

Posted by Picasa

Thursday, May 20, 2010

March Goal: Yeast Bread

March has come and gone, and I've only sort of accomplished my March goal. Technically, these fantastic cinnamon rolls are made from a yeast dough, but a) they don't compare in difficulty to a full-blown bread, and b) I've made cinnamon rolls with yeast before. Actually, I used to make basic cinnamon rolls every Christmas for breakfast.

So why have I cut corners? Well, March was crazy: the busy season of my last semester of classes and the weeks before I presented research at a conference in Seattle. Also, for the potluck on the last Thursday of March, everyone was supposed to bring something from their past, or their family, and, as I said, I used to make cinnamon rolls for Christmas. So I killed two birds with one stone.


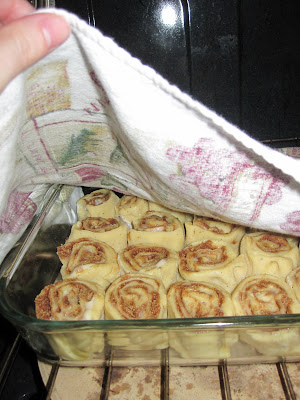
I was able to take this opportunity to fix the things that never worked out so well about my Christmas morning cinnamon rolls. First of all, I don't remember doing much actual kneading of the dough. Secondly, in my impatience, I'd make the rolls, then set them in the oven set at the lowest setting to let them rise. Instead, they'd often just dry out and stay the same size. (My dear family never complained, and even complemented the rolls on not being too sickeningly sweet and gooey.) This time, I kneaded the dough thoroughly for the recommended 10 minutes. Also, I let it rise both before and after forming the rolls, both times in an oven that had been turned on, and then turned off.

Oh, and these weren't just plain Jane cinnamon rolls; they were cardamom cinnamon rolls. Perhaps I haven't been blogging long enough for you to know this, but I am pretty obsessed with cardamom. And I had recently obtained whole cardamom pods from my friend Aditya (who uses them in savory Indian cooking). So that was quite a treat. And one last thing: there's no cream cheese frosting on top of the cinnamon rolls; it's actually spread on the inside before the cinnamon-sugar filling, so it permeates the whole roll. Perfection!

After all was baked and eaten, it's clear that the cinnamon rolls were a good move. And I can always fit some more intense bread-baking into the less-stressful summer months.


Cardamom Cinnamon Rolls
from The Paupered Chef

Ingredients
for the dough
3/4 cup milk
1/3 cup sugar
1/2 cup unsalted butter at room temperature
3/4 tsp salt
1 package yeast
1 egg, beaten
3 cups all purpose flour
zest of 1 lemon
two teaspoons whole black cardamom pieces (from inside cardamom pods), ground in a mortar and pestle or spice blender

for the frosting filling
4 oz cream cheese at room temperature
1 cup powdered sugar
6 Tbsp unsalted butter

for the cinnamon filling
1 cup brown sugar
1 Tbsp ground cinnamon

for topping the rolls
1 egg, beaten
1/2 cup pearl sugar (optional)

Directions
1. Scald the milk in a saucepan (until bubbles form around the edge, but before the whole thing boils).
2. Put the butter, sugar, salt, and cardamom in a large bowl. Pour in the hot milk and stir to combine.
3. Proof the yeast: put it in a small bowl with 1/2 tsp sugar and 2 Tbsp warm (but not hot) water. Meanwhile, add about half of the flour and the lemon zest to the milk mixture, and stir well. When the yeast begins to foam, add it to the milk mixture, along with the beaten egg. Mix well.
4. Continue adding the rest of the flour, and stirring until flour is mostly mixed in. Switch to kneading with your hands, adding flour until the dough no longer sticks to your fingers (it should feel sticky, but not actually stick, thanks to the butter). Knead for approximately 10 minutes.
5. Cover the dough in the bowl with a kitchen towel and allow to rise in a warm place for at least an hour. (One good option is to turn on the oven to the lowest setting while kneading, and turn it off before setting the bowl in the oven.)
6. While dough is rising, combine frosting ingredients in a mixing bowl and beat with a hand mixer until smooth. In a separate medium bowl, mix together the brown sugar and cinnamon.
7. When the dough is about double in size, turn it out onto a lightly floured surface, and divide it into 2 pieces. Roll one piece into a large rectangle, about 1 foot by 1 1/2 feet. The dough should be about 1/4 inch thick.
8. Spread half of the frosting mixture into a thin layer on the dough (avoiding the outer inch of the dough). Sprinkle with half of the brown sugar mixture.
9. Roll the rectangle from one of the longer sides into a long cylinder. Transfer the roll to a cutting board, and use a very sharp knife to cut the cylinder into 1 inch wide pieces. Set these into a rectangular baking dish, with no room between them.
10. Roll out, frost, sugar, roll up, and cut the second piece of dough, placing the rolls in the baking dish with the others.
11. Cover with plastic wrap and a kitchen towel and allow to rise in a warm place for 45 minutes.
12. Preheat the oven to 350 degrees F. Uncover the rolls and lightly brush them with the beaten egg. (Optional: sprinkle with the pearl sugar).
13. Bake the rolls until they just begin to brown, 15-20 minutes.

Did I mention that that was the night that the 5th seeded Bulldog basketball team from my alma mater, Butler University, beat the 1 seed Syracuse? Here's a screen shot when they were tied...

Posted by Picasa

Saturday, May 15, 2010

Potluck 3/11: Molten Melty Goodness

Madison brought us an unusually early spring this year. The snow was melting in March (a month earlier than usual), and the sun shone surprisingly often. Melting snow made me thinking of melty foods, and, let's face it, even a "warm" spring can be quite chilly, and the comfort of melty cheese or molten chocolate sounded wonderful. This early-March potluck was full of delicious foods, whether melty, molten, or just melt-in-your-mouth.

Gabriel contributed the ultimate melted food: cheese fondue. Ok, so we kind of cheated and picked it up in a package from Trader Joe's, but you would never be able to tell. This "Swiss Beer Fondue" tasted like a good blend of swiss and gruyère, and had the perfect texture after it was heated in a pot on the stovetop. We then moved it to the table and served it with sliced veggies, chunks of bread, and a cut up apple. Perfection.

In the melt-in-your mouth category (and in the "hooray it's spring and some cooking can occur outdoors" category), Carlos brought his signature black bean burgers, that he cooked on the grill, topped with melty cheese, and served to the ravenous crowds. And you better believe that I'm including a recipe at the end of this post...

But that's not all! For dessert, Kristin brought cinnamon rolls, with frosting oozing over their tops, and I made mini molten chocolate cakes. The big kicker? They're gluten free! And the weirdest ingredient in them is corn starch, which really isn't that weird. Oh, and also they're pretty delicious. Especially topped with whipped cream. Actually the original recipe, from Jacques Pepin, includes an apricot cognac sauce. I haven't tried that yet, but I'll include it in the recipe at the end anyway - you'll have to let me know how it is if you try it out!


Carlos's Fridge Black Bean Burgers

Ingredients (approximate amounts)
1/2 cup grated carrot
1 small onion (finely chopped or grated)
2 cans black beans, drained and rinsed
2 eggs
at least 1/4 cup wheat germ
1/4 cup sesame seeds
a small handful of oats (optional)
minced parsley and sage
salt and pepper
1/4 cup shredded parmesan or cheddar

Directions
1. Preheat a grill to medium (this could also be done, and might be easier on a grill pan)
2. Mash all of the ingredients together in a bowl. (Or mix in a food processor, pulsing a few times, so the mixture is not entirely uniform). The mixture should stay together. If it is too wet, add more wheat germ or oatmeal.
3. Form patties just smaller than a fist. You're looking for something closer to a slightly flattened sphere than a disc.
4. Grill those patties! Grill on one side until the side is set enough that you can lift it with a spatula without it falling apart. Flip it, and grill until the other side is equally set.
5. Enjoy with some cheddar cheese and salsa or ketchup.

Chocolate Cake & Apricot Cognac Sauce
from Jacques Pepin’s Fast Food, My Way,
...and passed to me by my awesome officemate, Bonnie

Ingredients
8 oz (225 grams) bittersweet chocolate
8 tbsp (1 stick or 110 grams) butter
2 tbsp sugar
2 tsp cornstarch
2 tsp vanilla extract
2 large eggs
2 large egg yolks
½ cup apricot jam
2 tbsp warm water
2 tbsp cognac

Directions
1. heat oven to 350 degrees
2. over a bain marie, melt chocolate, butter, sugar, cornstarch, vanilla. whisk until smooth.
3. add eggs and yolks and whisk again until smooth
4. pour into individual ramekins or muffin tins which have been sprayed with nonstick cooking spray
5. bake for 8 minutes (they may not look done, but seriously, take them out after 8 minutes!)
6. let them cool to room temperature (even though you will want to eat them right away)
7. combine jam, water and cognac until smooth
8. flip dessert over onto plate and top with sauce
Posted by Picasa

Thursday, April 29, 2010

Potluck 3/4: Going Gluten-Free

Potlucks aren't always huge affairs. Sometimes they're small groups, maybe only three couples. And they can be just as good as the large and sometimes crazy potluck parties.

Laura was celebrating going from a diet essentially free of all things good and beautiful in the world (cheese, etc), to a gluten-free only diet, so the theme was "gluten-free." As I am learning more and more, this doesn't have to be such a constraining thing. It's more of an opportunity to try new things and generally eat healthier! The dishes were chicken panang from Carlos and Lana (delicious!) a Cajun rice dish from Geoffrey ( jambalaya? whatever it was, it was delicious!) and a double-chocolate pear cake courtesy of yours truly (recipe below!). The master mixologist, Geoffrey, also prepared some perfectly balanced margaritas and cosmos.


Double Chocolate Pear Cake (Gluten Free!)
adapted from Tartelette

Ingredients
1 stick unsalted butter, at room temperature
1/2 cup sugar
3 large eggs
2 oz semisweet chocolate, melted and slightly cooled
1/4 cup buttermilk
1/3 cup sweet rice flour (*see note below)
1/3 cup sorghum flour (**see note below)
3 Tbsp cocoa powder
1 1/2 tsp baking powder
1 or 2 pears, ripe, peeled, cored, and thinly sliced

* I couldn't find sweet rice flour, so I used 1/3 cup minus 2 tsp brown rice flour and 2 tsp corn starch
** You can also use quinoa flour like I did, or amaranth flour. OR you can substitute 1 cup all purpose flour for the 2/3 cups gf flour in this recipe, if you want to make gluten-FULL recipe.

Directions
1. Preheat the oven to 350F. Butter a loaf pan (dust with rice flour if you want).
2. Beat the butter and sugar in a large bowl at medium speed, until light and creamy.
3. Add eggs one at a time and beat them in at low speed.
4. Add melted chocolate and buttermilk, beating until combined after each addition.
5. Sift in the flours, cocoa, and baking powder and beat for 30 seconds (still at low). Increase the speed to medium and beat for a minute.
6. Pour the batter into the prepared pan and place the pieces of pear on top.
7. Bake for 30-40 minutes. Cake is done when the top has set, and a cake tester inserted (into cake, not pear) comes out clean.

Although it wasn't *quite* the same as a regular cake, it was still delicious, and was more crumbly and cakey than the typical flourless chocolate cake. Success!

Posted by Picasa

Thursday, March 25, 2010

Potluck 2/26: The Wine-al Countdown

Mike, the man who can always be counted on to bring a 12 pack of beer or an extra-large bottle of wine, hosted the last potluck in February. In typical Mike style, he came up with a potluck theme that combined scientific rigor with a love for wine: an old fashioned wine-tasting. We brought bottles of wine, put them in paper bags, and then numbered them, so we could taste unencumbered by the knowledge of the quality of the wine or who brought it.


There was also food, of course. A delicious lentil dish, a cheesy tuna bake, pasta with homemade pesto, spicy cheesy potatoes, and a bourbon apple cinnamon bundt cake (which was my contribution). My cake was tasty enough, but really nothing special. And I didn't adequately butter the bundt pan, and when I tried to un-bundt it, it broke apart. So we ate it from the bundt pan. I can assure you, it was much better that way. Did I mention the bourbon glaze that got poured over it? I guess it was a little special. I got my recipe from The Kitchen Sink, and you can go there if you want the cake recipe. But let me just give you the glaze recipe, for pouring over whatever you want to taste like bourbon. Mmm.

Bourbon Glaze
from The Kitchen Sink

Shake a scant 1 cup confectioners sugar and 2 Tbsp water in a mason jar to mix. Add 1 or 2 Tbsp good quality bourbon. Shake some more. Pour over cake, ice cream, poached fruit, or just into your mouth.

But back to the wine... here were the rules. Pour yourself a small (or large) cup of wine. Remember the number on the paper bag you poured from. Drink wine. If you are a true connoisseur, make mental notes on the flavor profile and think long and hard about what rating (between 0 and 10, with one decimal place allowed) you should give the wine. Write your rating in the row next to the wine number you drank. If you're just a regular person, sip wine, swish it around in your mouth, and pick a random number that may or may not correlate to the actual tastiness of the wine. Write said number in the correct row.
I personally only found a few wines that inspired either praise or serious dislike. Otherwise I went more with the "pick a number" method. There was plenty of good conversation, so it was also common for people to forget what number wine they just tried. What I'm saying is, that it wasn't a perfectly scientific study. But it sure was fun.
Near the end of the night, Gabriel took a calculator and tallied scores. Mike had provided prizes for the best wine, and for the best value wine (the wine with the highest score to price ratio). It should be noted that ratings of "i" and "pi" were disqualified for being imaginary and irrational, respectively. The rating, "ASS," was counted as a 0.

Katie and Kevin won the Best Value award, with their wine, Green Fin White Wine, at a price of $3.99 at Trader Joe's. Here is Katie accepting their prize, a princess bubble kit! (Yay!)

Gabriel's wine won the Best Overall award. He brought an Ulrich Langguth Riesling. Here we are accepting his prize of a scary inflatable pig punching balloon. It was truly scary, so I have spared you all by not posting pictures of it. It should be noted that Gabriel also brought the worst wine: Zarafa Sauvignon Blanc. Apparently, a giraffe on the bottle does not a good wine make. If you can decipher Gabriel's handwriting, here are the full results:

Posted by Picasa

Saturday, March 20, 2010

February Goal: Mussels for Valentine's

After having a delicious bowl of mussels with chorizo at The Blue Marlin during winter restaurant week, I decided I would recreate this dish for my February cooking goal.

Gabriel and I decided that instead of going out on Valentine's Day and facing overpriced meals and crowded dining rooms, I'd make dinner on the 14th, and we'd go out to our favorite restaurant, Sardine, later in the week. So mussels and chorizo went on the menu for v-day.

I don't often cook seafood, and when I do, it's usually fish from the freezer section. So even buying the mussels took me out of my comfort zone. I found a small seafood store in Madison, and ventured there on the 13th. I bought 2 lbs of fresh mussels, and stored them in the fridge in a bowl covered with a damp cloth. The next afternoon, I found one of the mussels had clamped on to the cloth. They were alive for sure!

To prepare the mussels, they first took a 30 minute soak in bowl of flour and water (so, in principle, they will disgorge sand and take in flour, making them plumper). Next I went over the shells with a wire scrubber and pulled out the stringy "beard" that helps them attach to rocks. I also discarded mussels that were open and didn't close after I tapped them. Finally, the mussels went into a hot pot of white wine, tomatoes, chorizo, shallots, garlic, and thyme. I was roughly following an Ina Garten recipe to make sure I had about the right proportions and for the method, but otherwise I was winging it. (My recipe appears at the end of this post.)

After a few minutes steaming in the wine, the mussels started to swing open. Gabriel and I peered in through the clear lid at the yawning shells. The smell of shallots cooked in chorizo fat was making our mouths water, and it was difficult to wait the 8 minutes it took for them to steam.

The rest of the menu was decided at the last minute. I was going to make short ribs, but I didn't have a great recipe for them. At the farmer's market, the vendor showed me a few different cuts of meat, and I finally decided on a large top sirloin that ended up providing 4 smaller steaks.

For dessert, Gabriel wanted something chocolate (maybe), and not fruit (probably). He's more of a milk chocolate guy, while I often find milk chocolate too one-note and sweet for my tastes. But I found a very interesting and not-at-all one-note recipe in Bon Appetit's February special on milk chocolate.

mussels steamed in white wine with chorizo
Dr. Beckermann Liebfraumilch (our favorite Trader Joe's wine)

top sirloin from Fountain Prairie Farms
butternut squash risotto

Les Jamelle Pinot Noir (a gift from Carlos and Lana)

Mussels Steamed in White Wine with Chorizo
Serves 2-3 as a large appetizer

Ingredients
2 lbs fresh mussels
1/4 cup flour
1/2 lb bulk chorizo
1 Tbsp + 1 tsp olive oil
2 or 3 shallots, chopped
2 or 3 cloves garlic, finely chopped
1/2 14oz can diced tomatoes
1 1/2 cups white wine
1 cup chicken broth
2 sprigs fresh thyme

Directions
1. To prepare the mussels, put them in a bowl with 2 quarts water and flour, and let sit for 30 minutes. Pull off the "beard," and scrub shells with a brush or metal scrubber if they are dirty. Discard shells that are open which do not close tightly soon after being tapped.
2. Heat 1 Tbsp olive oil at medium-high in a large pot with a tight-fitting lid. Break chorizo into small pieces and brown it in the olive oil.
3. Remove chorizo with a slotted spoon, leaving the fat. Add additional olive oil if needed. Saute shallots in the oil until they are tender. Add garlic and saute for 2 minutes more, stirring, and making sure the garlic doesn't burn. Add tomatoes.
4. Pour in white wine, and let it boil down for a few minutes, scraping the bottom of the pan. Add the chick broth, reserved chorizo, and thyme. Bring to a boil.
5. Add the mussels. Cover the pot and steam for 8 minutes. Discard any mussels that have not opened after 8 minutes.
6. Serve mussels in bowls, and ladle cooking broth and chorizo over them. Enjoy!


Posted by Picasa